How to Build an Efficient and Secured Discord Server
Sorry the images can be quite large, the issue is not fixed yet!
Hi, I’m back!
I hope you all had a fantastic end of December, Christmas, Happy New Year or any other celebrations that you might enjoy.
My life has been pretty busy recently with a lot of things to manage, but I aim to be consistent again with the content I produce on CM Adventures, with 2023’s new article centred on Discord servers and their security.
So let’s keep it up, and drop your comments below so we can continue to grow together!
Cheers,
Introduction
As often, I will focus on Gaming; But most of the article can be applied to any Discord server.
A community can only grow if it feels safe thanks to your Guidelines & Rules so they’re covered from the inside… but also safe from spams, scams, or hacks from the exterior.
💡 Read my article How to Start a Community if you’re starting from the very beginning!
Fortunately for us over the years, Discord has implemented new features that will help you protect your community from most direct harms.
Additionally, there are great tools created by passionate developers & professionals which can also enhance the security of your server.
But let’s jump directly to what you’re looking for: How to Build an Efficient and Secured Discord Server.
Roles and Permissions
→ A Role can be a attributed to as many users as you want.
→ Permissions can be attributed to each of these Roles, and even in the case of someone without any Role; It is called “Everyone”.
→ Then each categories & channels have set permissions for these roles, which allows you to provide more or less power to users depending on their Role.
💡 In the past, we had to set up the permissions to each roles and for each channels… but you can now set permissions for a category directly, and then synchronise each channels’ permissions to the category!
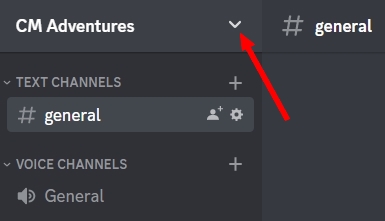
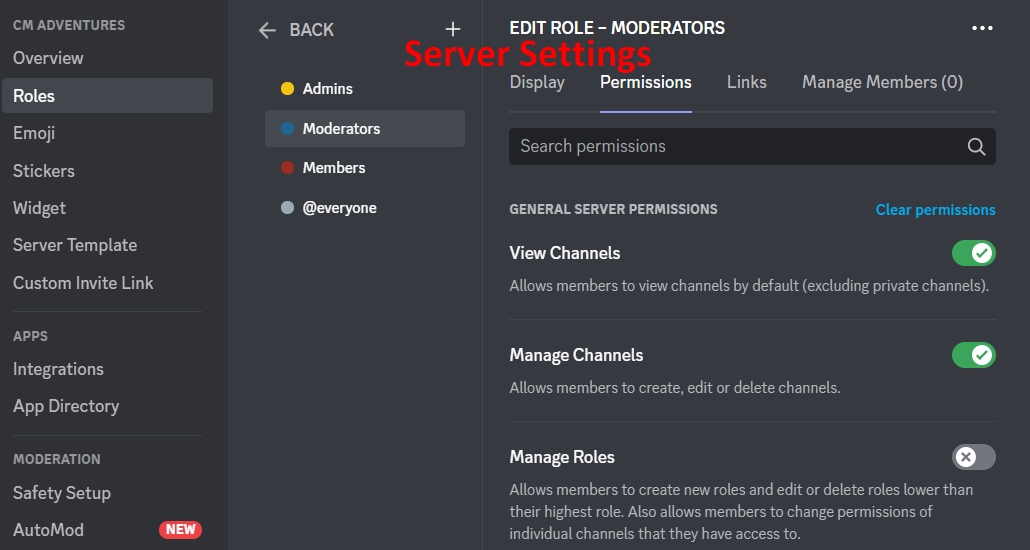
▲ First thing first: Create Roles for your server, via the little dropdown arrow top corner left, next to the server’s name > Server Settings > Roles > Create Role
▲ I usually separate Roles into 3-4 pockets:
- Admins
- Dangerous roles that you should keep for yourself and/or people that you highly trust.
- Can be divided in two, with “true Admins” who can literally erase your server’s structure, and Admins that are here to represent the highest rank as an important part of the team without the precious “Administrator” permission.
- Moderators
- Dangerous roles that you should keep for your Moderation Team and/or people that you trust to keep the server clean.
- 💡 Moderators will be instrumental in keeping your server safe, so read the following article: How to Build & Manage a Team of Moderators.
- Specialised roles
- Modders or any role that needs to be separated from the users. Usually a hybrid moderator-user role with moderation power in selected categories channels.
- Users
- The bulk of the server, your members.
Roles can be dragged and dropped in the Roles tab to change their order. This is very important because the roles higher in the list can only perform moderation on people below them.
Roles can also be used in a purely cosmetic way to change the color of a user’s username. Every user has the colour of the highest coloured role assigned to them.
▲ For the example I have created a server with Admins, Moderators, and Members Roles.
Here click on the three dots … to then set the roles’ permissions.
- Admins
- Tick “Display role members separately from online members”
- In Permissions, go to the bottom and tick “Administrators”. This role will allow Asmins to do almost everything that you can do as the owner of the server.
- 💡 Each Discord server has one owner, by default, this is the user who created it. The server owner always has all the permissions, no matter which roles they have, note that they’re the only user able to delete the server.
- Moderators
- Tick “Display role members separately from online members”
- Tick “Allow anyone to @mention this role” so anyone can ping it to get attention
- In Permissions, tick the powers you want to grant them like “Change Nickname” or “Manage Messages” for example. Don’t forget the vocal channels permissions “Mute/Deafen/Move” if you have any.
- Members
- Tick “Display role members separately from online members”
- In Permissions, untick “Mention @everyone, @here and All Roles”. They can still ping your Moderators as we’ve set the Moderators role for it.
- @everyone will ping every single members of the server, even if they’re offline, quite the nuisance.
- @here will ping every online members. You also don’t want your members to ping so many users, you’d get too many notifications.
- For “Everyone” they should only be able to see channels, post comments, leave emojis, join vocal chat by default + some additions depending on the server, and that’s it.
- Apply colours and other permissions as needed
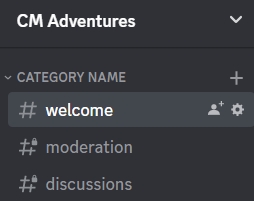
▲ Now that your roles are in place, it is time to create your structure of categories & channels for the Discord server. You should have planned it beforehand so it is easier to create the categories, and the channels that will be linked to the latter.
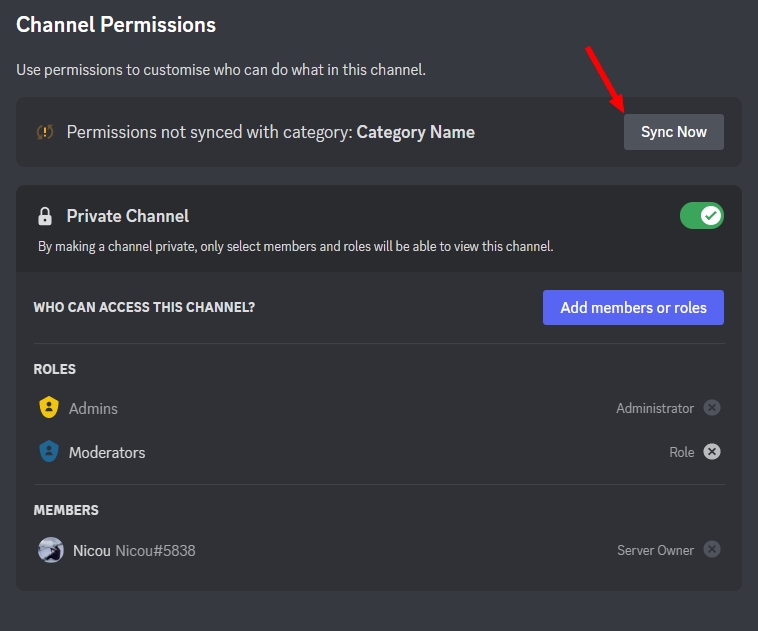
💡 Keep in mind that most of the time you should apply the Permissions to the category itself, and then sync the channels. It is done via the channel’s permissions. Once it’s done, feel free to make a few edits to some channels for example making the first channel of the category a Read Only channel.
💡 I usually denies all Permissions to “Everyone”, apart from a single entry point channel such as #welcome, to keep my channels safe from new users and possibly spammers.
✅ If a permission is set to “Allow”, it is set to green for @everyone, a role or a user.
❌ If a permission is set to “Deny”, it is set to red for @everyone, a role or a user.
➖ If a permission is set to neutral, it will inherit whatever permission is set on the server settings/role level. Keep that in mind, it’s very important, and also a matter of preference of how you set up your roles. Certain admins like to set a lot of things as neutral and inherited from the server settings, and others prefer to set everything as allow or deny. The latter is more time consuming but it can help you tighten security.
We will start with a very basic structure of one category and three channels for the example, so we can review each permissions.
→ Category: Parent of a group of channels, you can set permissions here and Sync your children channels at the top of the Permissions settings.
→ Channel: Place to write text or even to discuss vocally if it is set as so.
→ Thread: A sub-channel, often temporary and open for a dedicated topic within a channel.
→ Forum: An other way of using channel. Anyone can create a thread in a forum to discuss topics. Only enabled on Community Servers, which can be activated via the server’s settings.
▲ Advanced Permissions:
- General Channel Permissions
- View Channel – Allows members to view the channel or not. Admins bypass all permissions. You might want to hide channels if you keep track of all old channels via an Archives category.
- ⚠️ Manage Channel – Don’t allow this and keep it for the Admins. Members could change the channels’ names, descriptions, settings and even delete them.
- ⚠️ Manage Permissions – Allows members to change the roles permissions, don’t allow this and keep it for the Admins.
- ⚠️ Manage Webhooks – Allows members to create, edit, or delete webhooks. A Webhook is a feature that allows apps or sites to post in these channels.
- Membership Permissions
- Create Invite – I usually disable this, because I have already created a single entry point channel sur as welcome; So everyone use the same Discord invite link. Of course, your link must be visible to all in your welcome channel so they can invite users by copy pasting that link!
- Text Channel Permissions
- Send Message – Allow, unless it’s a read-only channel for the top view information of your server or a category.
- Send Message in Threads – Same, but for threads depending on the permissions set below.
- Create Public Threads – Anyone can open a thread for everyone.
- Create Private Threads – Anyone can open a thread for specific invited members.
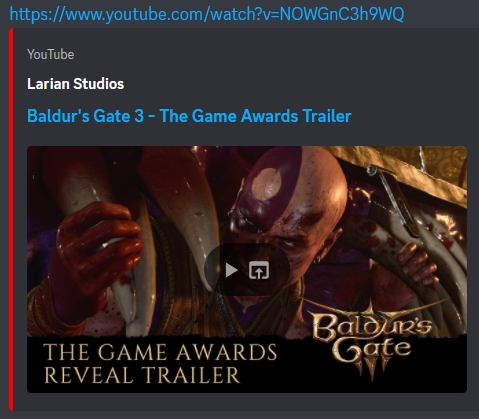
- Embed Links – When users post a link it can be embedded automatically if this is enabled, which means it will be displayed in full. A YouTube link would propose a reader so you can see the video directly in Discord without opening the link. Note that even if that option is allowed, users can cancel an Embed by placing the link between two <>: <URL LINK>
-
- Attach Files – Allow users to upload files in the channel, whether it’s an Excel sheet, a video, an image…
- Add Reactions – Reactions are emojis that users can use to react to message. If you hover on the message, an emoji symbol will appear. Useful to tell others how you feel about a message. Note that Reactions are extremely useful as it allows you to count who reacted to each reactions. You could use these Reactions to automatically give permissions to users who clicked on a Reaction for example.
- Use External Emojis – Do you want users to use any emojis in the servers they have joined, or only the emojis from your server? Keep in mind that they could use literally anything as emojis and it can sometimes be messy if it is allowed.
- Mention @everyone, @here and All Roles – Don’t allow this. Members should only be able to @ the Moderation team, or other users directly and not everyone in the server. Roles that have been set as pingable will still be pingable. (Ping = @ a user to send a notification
- ⚠️ Manage Messages – Keep this for Moderators
- ⚠️ Manage Threads – Keep this for Moderators
- Read Message History – Allow this, it’s annoying to open a channel to see that it’s empty
- Send Text-to-Speech Messages – Allow this if you want users to be able to use a tool that will read the text. It’s a feature from Discord, and it doesn’t disturb other users. Allow this to help your users with difficulties reading text.
- ⚠️ Use Application Commands – Useful to allow users to use the bots you might have prepared for them. Don’t allow this if you don’t have any bots they should use.
- Voice Channels Permissions
- Connect
- Speak
- Video
- Use Activities – This is a feature allowing players to join a vocal channel to play games with other members, it is embedded into Discord. Why not.
- Use Voice Activity – Voice activity is the contrary of Push-To-Speak, pushing on a keybind set in your settings to talk. Voice Activity is easy to use but be wary of users with clicky keyboards, pets, children…! ^-^
- Priority Speaker – Users with this permission will speak louder than others when multiple users are chatting at the same time. I don’t allow this usually, but it can be useful for certain situations.
- ⚠️ Mute Members – For Moderators
- ⚠️ Deafen Members – For Moderators
- ⚠️ Move Members – For Moderators
- Event Permissions
- ⚠️ Manage Events – For Admins and certain group of users if you set up Events such as release dates or important milestones.
Offical Features
Over the years, Discord has prepared many features that will help you with Moderation.
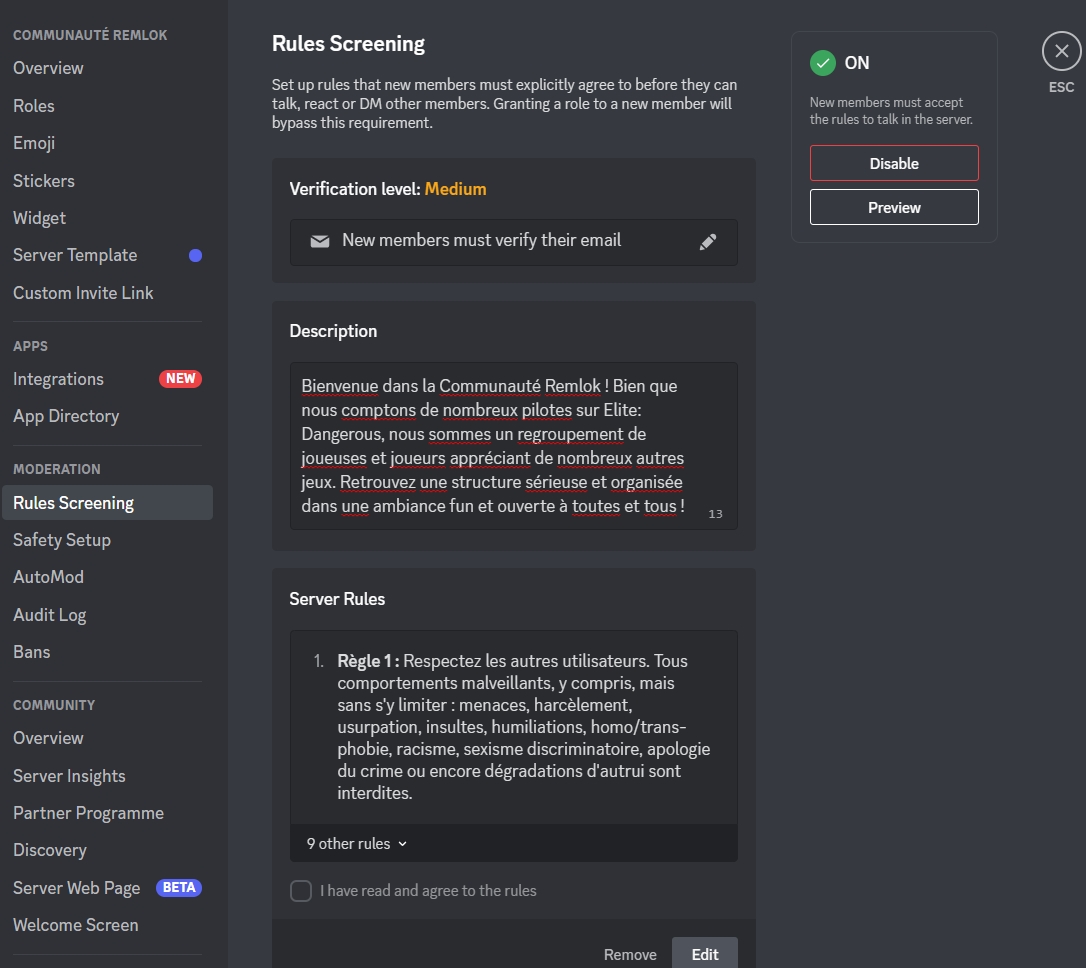
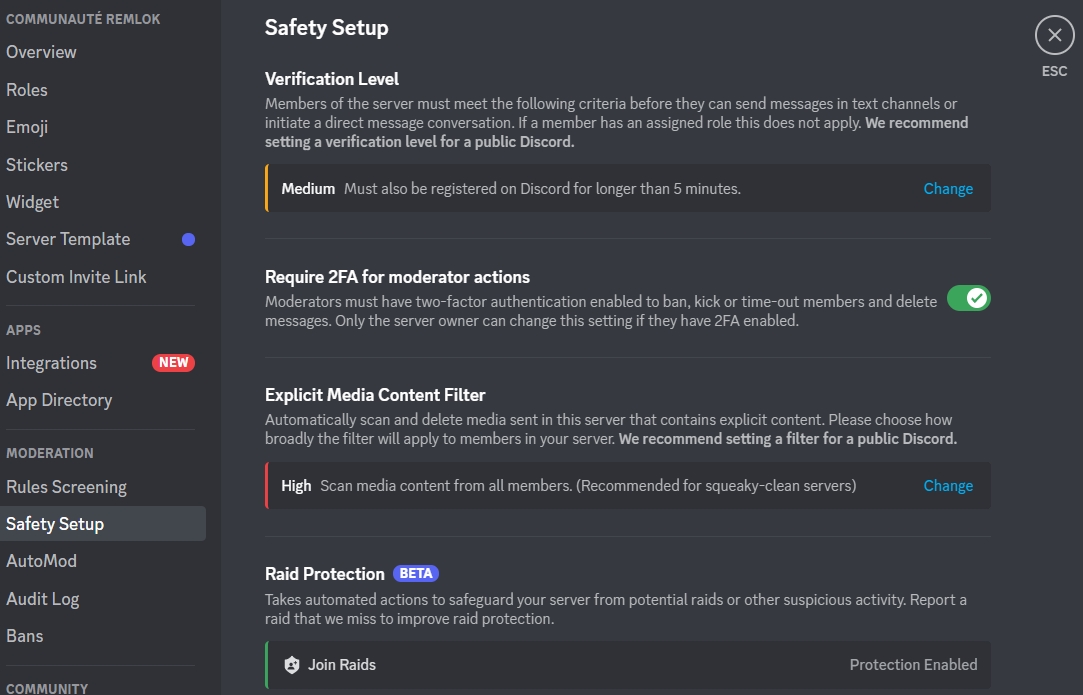
- Set up your rules that users have to manually accept. Once accepted, they will then be able to chat on your server. You can add extra layers of security such as a verified email requirement.
- 💡 One of the biggest spam/scam threat comes from users who had their accounts token stolen (account hacked). It can happen to any member of your server who isn’t careful enough and could click on a spiked URL. Never click on links if you don’t trust the user.
- Increase the Safety by enabling diverse levels of security. Keep in mind that it can bothers your trusted members, so find the right balance.
- 💡 You can also enable the recent new Raid Protection to counter known raids of spammers.
- 💡 Enable 2FA authentication for Mods/Admins. If any of your Mods or Admins’ accounts get hacked, you will be in a very bad position.
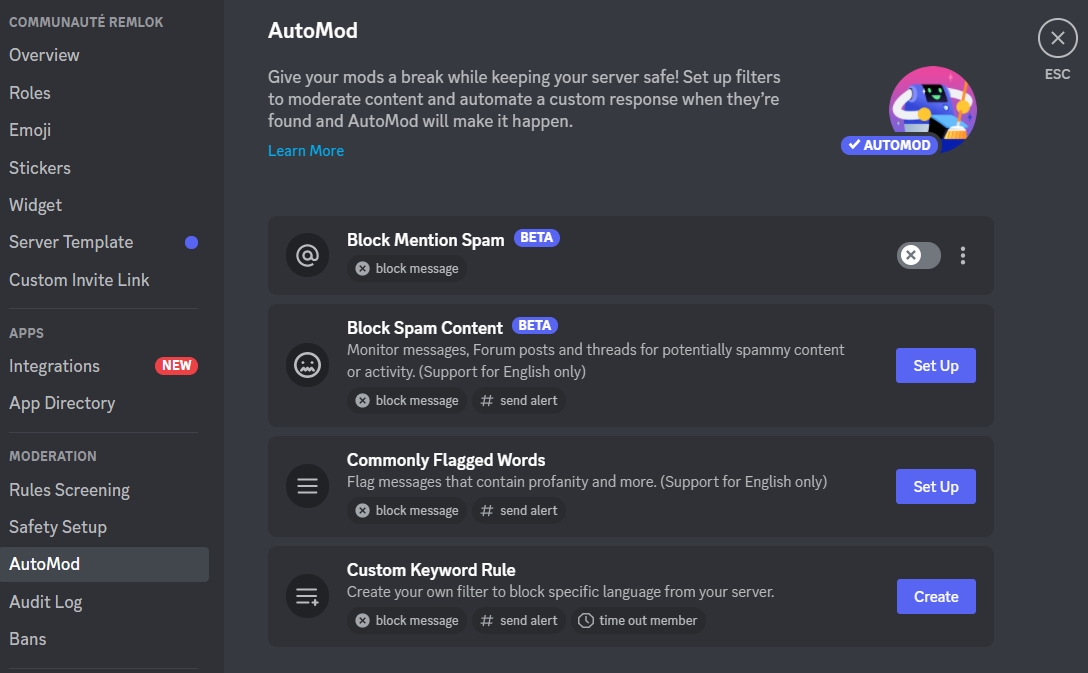
- AutoMod allows you to automatically denies/delete/block key words, spam of messages, etc… and set automatic moderation rules for it. It is very useful if you don’t want to use more advanced bots.
Bots and Tools
Here is a list of Bots I use:
- Dyno – To me the best Moderation bot, that you can use for free very efficiently. It lets you kick, ban, deafen, and even warn users through an easy to use web dashboard and commands on Discord. You can set times to each commands for example to ban someone for x days. After banning a user, Dyno can also save their chat messages instead of letting Discord auto-delete them. Dyno also record everything in logs channels, which is incredibly important for me to review everything that is happening inside my server, either coming from users or actions done by my moderation team. Many additional and very useful features such as users notes, reactions/roles addition, and more
- YAGPDB – Yet Another General Purpose Discord Bot is an advanced configurable discord bot providing a load of useful features for help with managing a server. I use it as a back up in case Dyno is offline due to unforeseen events or maintenance. Always be ready for anything, and YAGPDB is super stable.
- Zira – Lets users add and remove roles from themselves by simply reacting to a message. Super customisable and reliable as an alternative to Dyno’s feature.
- 💡 It is a very common feature used by many servers to customise players experience, so they can be @pinged for exactly what they want to hear about.
- StatBot – The metrics, the good ones. Sorry Discord Insights but your metrics are not very precise. Now we’re talking! 🙂
- Beemo – Set it up under one minute, and equips your server with a powerful antibot algorithm that operates in the background to stop userbot raids against your server, mitigating bot raid threats automatically and effectively by mass-banning them on-sight with a fine-tuned detection that avoids real users.
- And usually one or multiple in-house bots that I use to automatically share Tweets in a given channel, propose Q&A with developers, sort feedback, count games played by the members and gametime, additional security, etc…
A list of Bots you could also use:
- MEE6 – A bit expensive if you use its best tools that other bots doing very well for free. A bit too fluffy with a few EXPerience gadgets to level up members so I don’t use it but it doesn’t the work if you prefer it to Dyno. It can have its use, but it’s down to preference.
- CarlBot – The turtle branded moderation bot is gaining more fans as it is sturdy, customisable, reliable, and provides a lot of features. For small and medium size servers.
- Arcane – Similar to MEE6, more affordable if you dislike Dyno, CarlBot, and MEE6.
I will let you discover these bots by yourselves but let me know if you want to chat about these!
The setup
- Think about your Roles
- Think about your Structure, do a mock-up
- Think about the Moderation Team, what permissions you want to give them, how many mods you want (1 per 1000 members is a good start)
- Think about the Bots and Moderation Matrix
- Build your server!
- 💡 If your server is already Live, I would advise you to build a new server on which you will prepare all the changes and permissions. It will be easier then to proceed with the changes behind the scenes, copy paste everything and set the permissions.
- 💡 Don’t transfer ownership if you are a Partnered Discord server! You would loose the status. Contact your Discord rep to make the change.
- At the end, test the server by going to Roles. Select a Role, click on “View as Role” and review the server. Do this for each roles to assess if it’s right.
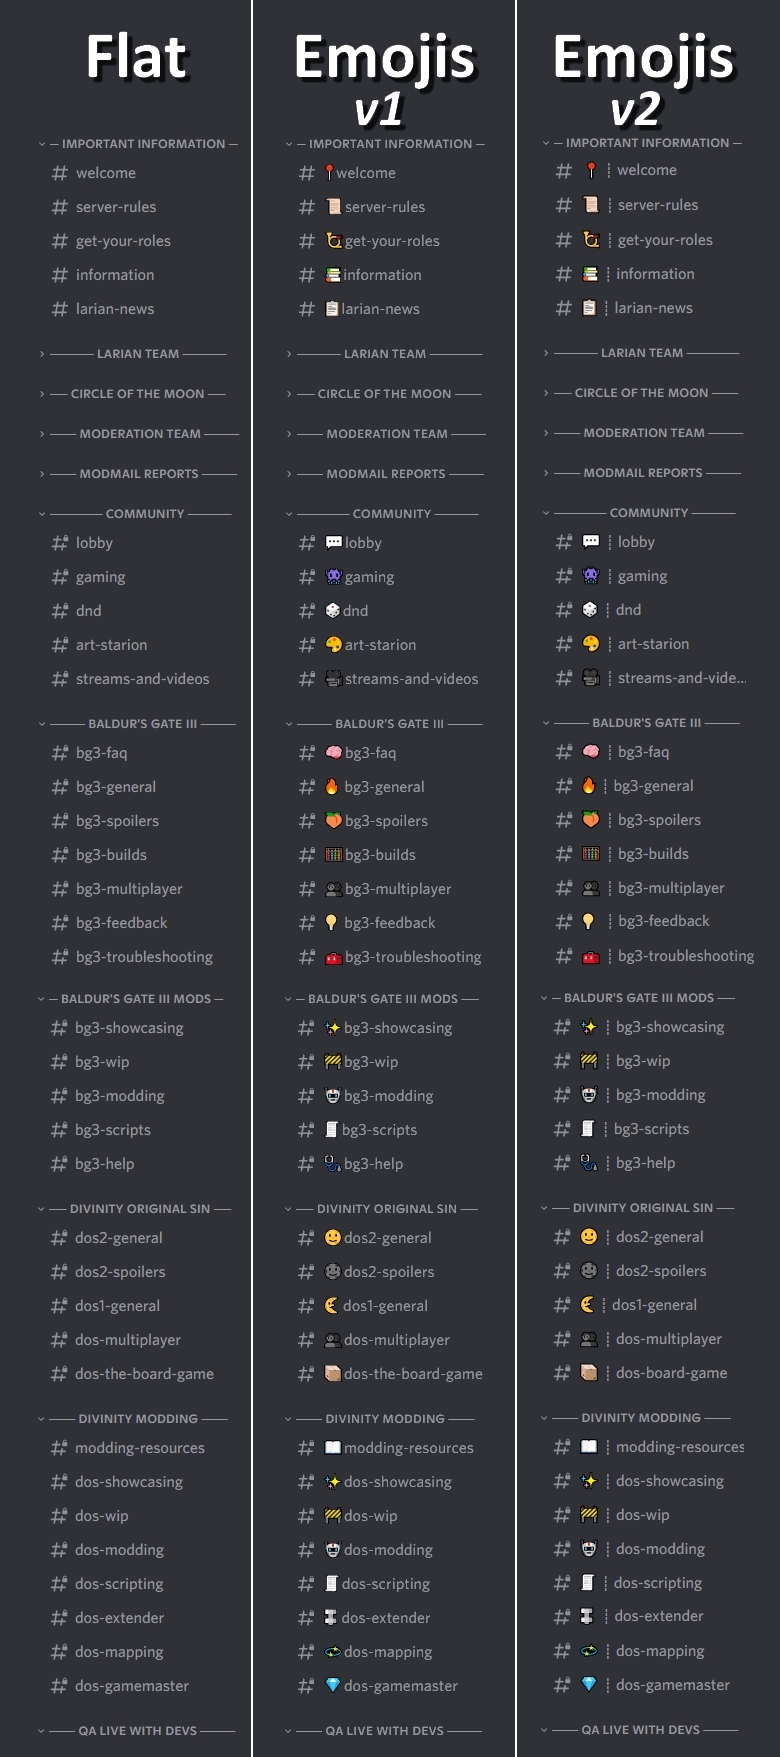
Here is an example of what I had set up for Larian Studios, in several forms.
Of course every channels contains descriptions, and details set up with the correct permissions.
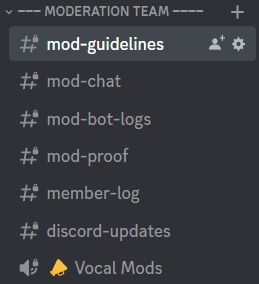
The Moderation Team, having its own category, will be able to efficiently work thanks to your guidelines.
Let them know about their tasks, the bots, the roles in the server, the admins they should contact if they need help, and even the Moderation process step by step to help them understand how to proceed.
For example:
This is just a general guideline of what you should do when you find something you feel might require moderator action. Please remember to keep your cool & stay friendly yet professional during all moderating exchanges.
-
Step 1: Assess whether the incident is minor enough to require just a verbal warning (private DM for incidents related to names/statuses/profile pictures, or public messages for rule-breaking messages within the server), or is a repeat offense/offensive enough to require the use of @Dyno moderation commands. If you are unsure or busy, ask for assistance of others in the moderator chat (we are a team!).
-
Step 2: If the incident requires the use of Dyno, then decide which rule(s) the user has broken and be ready to quote them in #mod-bot-logs.
-
Step 3: Take a picture of the relevant information & post it in #mod-proof. Make sure to state relevant info such as the rule(s) broken as well as the ID(s) of the user(s) involved using the <@ID> tag system and any important details. EX:
Rule 1, Language, @name -
Step 4: Once proof has been secured, delete any relevant public messages if it is directly harmful to the community. If the channel needs to be purged of a lot of messages, contact @Nicou.
-
Step 5: In #mod-bot-logs take the appropriate action against the user (warn/mute/ban), you can find the commands pinned in #mod-bot-logs. Please make sure to state the reason for this action in the bot command, including the rule number AND user name, the user involved will receive a copy of this. (If Dyno is down, you should use the YAGPDB commands)
-
Step 6: If it feels necessary, alert the mod team to the action you have taken, for example if you feel the user may continue to break the rules. Remember that users are not allowed to disclose their infractions.
Also explain the Bots’ commands themselves with examples and more details but don’t make it too overwhelming.
For the moderation timing, note that Dyno does everything in minutes, so 1h is 60m, 24h is 1440m, 48h is 2880m etc depending on your Moderation Matrix.
💡 If you can, set your #mod-proof as a Forum so mods can easily log images, the user’s ID, and details in a single thread. One thread per case.
And here are examples of three servers that I’ve build in the above mentionned three formats: Flat, Emojis, and Advanced Emojis.
I would suggest you to study these Discord server, to learn how they have set up their structures:
- Remlok Industries, my own community in French
- Crusader Kings
- Eve Online
- Hogwart’s Legacy
- League of Legends
- Apex Legends
If you need more details, feel free to contact me on Discord: Nicou#5838, or directly check out Discord’s guides.
